
LLM Development Playbook: Building an LLM agent on top of your company's Google Drive data with Vertex AI
This guide walks through building an LLM agent that can search and discuss your company’s Google Drive data. It works relatively well and doesn't take much time, but it has its limitations.


The solution at a high-level
Adding everything in the context window
Retrieval Augment Generation (RAG)
Summarised Table of Contents
Fine-Tuning
Why RAG?
Why Vertex AI?
Embedding your data into a vector DB
Searching your data for relevance
How is this different to just keyword searching?
Create a Google Cloud Project
Enable required APIs
Set up IAM roles
Create a Search App
Connect our GDrive as a data source
Authentication
Generate a token using GCP Console
Generate a token programmatically
Endpoints
Integrating into other LLMs
It’s very easy to set up
It’s not that flexible
Similarity matching can be very keyword based
Similar documents or templates tend to mask results
OUT_OF_DOMAIN_QUERY_IGNORED happens quite a lot
The data source tools are very basic
You have to give Google access to your entire Workspace
You can easily prompt your favourite LLM and get a detailed how-to. We know that. This article focuses more on the reasoning behind the solution, our real-world experience building and using it and the lessons we learned. Honest feedback, honestly.
We’ll refer to this as an ‘agent’ throughout, though technically it’s a search/retrieval tool that agents can use.
The plot
We were recently asked to build an LLM agent that integrates with other conversational LLMs to be able to answer questions informed by their company’s collective knowledge in Google Drive.
They had a shared Google Drive folder where each consulting client had a dedicated folder containing highly unstructured documents like reports, notes, and statements unique to that client. They wanted a better way to locate information, generate new documents and insights from existing materials, and interact with the shared drive through a conversational LLM that could both read from it and write to it. A very powerful asset for companies that deal with a lot of unstructured data.
For this article, I will focus on building an agent tasked with using the Drive’s data as context for answering questions. Writing to the Drive would require a different implementation and article altogether.
The solution at a high-level
You’ve probably used OpenAI’s or Claude’s projects features. You can upload a healthy number of unstructured files and documents, then start chatting with the LLM and it seems like it magically knows everything about your documents instantly.
While this makes the solution look simple, the LLM doesn’t just ingest the information once and then know it. There’s actually a lot happening behind the scenes every time you prompt it.
There are four approaches to solving this that we knew of:
Adding everything in the context window
This approach involves reading all the documents from the Drive and appending all the content directly into the LLM prompt. Obviously this would not work since it’s highly inefficient and won’t scale. You can only fit so much in the context window, and you generally want to save that for your conversation history as much as possible to keep the LLM on track.
Retrieval Augmented Generation (RAG)
RAG is currently the industry-favourite solution for problems like this and is likely what OpenAI’s and Claude’s Projects features use under the hood. The process works something like this:
Split each document into smaller chunks
Convert each chunk into a vector embedding using an embedding model
Store these embeddings in a vector database
When a user asks a question, convert the query into an embedding and retrieve the most relevant chunks from the database
Feed these chunks back to the LLM as context so it can generate an informed answer
Summarised Table of Contents
This approach is gaining popularity and can be quite powerful. Each document is processed by an LLM to:
Extract a table of contents along with summaries of its sections.
The resulting structure serves as an index that the LLM can reason over to identify where relevant information is likely located.
This method is lighter than full RAG but may be less precise for very large or highly varied datasets. It could also get quite expensive as the dataset grows, since you will need to traverse a large body of data each time to find relevance.
Fine-Tuning
This requires actually training the LLM on the company’s documents so the information is baked into the LLM itself. While this is the ideal scenario to have an LLM that just knows it all, unfortunately this approach is very expensive, slow and inflexible since it requires retraining every time a document updates and adds a premium on every LLM prompt since you’re using a fine-tuned model.
Why RAG?
We’ve designed and built numerous RAG systems across a variety of applications. Most recently, we delivered a fully custom RAG implementation for a classification tool, leveraging Supabase and pgvector to efficiently index, search, and reason over large datasets. Given our experience and the tools available for building RAG systems, we decided to try out this approach.
Why Vertex AI?
The decision to use Vertex AI came down to three main factors.
The first, the usual suspect, was time; there simply wasn’t much of it. So custom solutions may not be the way to go. Luckily there are quite a few tools that abstract a lot of the chunking and embedding process for you. It is worth noting though that this will come at the expense of flexibility and your ability to improve the quality of the results, which we will talk about later in this article.
The second was compliance and security, which are critical when handling sensitive data from multiple clients. They wanted to ensure that any data leaving their systems would pass through trusted platforms with enterprise-grade SLAs, certifications, and security and privacy guarantees.
The third reason was flexibility in handling accuracy. The main advantage of a custom RAG implementation is the level of control it provides. You can store embeddings in any structure you prefer and tag them with your own metadata, allowing you to filter and refine results outside the LLM and present it with a much narrower dataset to reason over. However, since their work was largely unstructured and data-heavy, and they only needed an assistant rather than a precision-critical system, it made more sense to use an out-of-the-box solution rather than build a fully custom implementation.
This pretty much limits us to the big three cloud providers. Given we’re dealing with Google Drive, it made sense to use Google Vertex AI, though both Azure and AWS have similar products.
Understanding how RAG works
It’s important to understand how RAG works so that you can understand certain nuances that come with it. It might inform how you organise your data and help you understand why it works a certain way in practice. There are two main stages in a RAG workflow that you need to be aware of.
To better illustrate, let’s pretend Adrian Monk has approached us, the fictional detective of Monk fame. As is his tedious and meticulous nature, he has a large collection of case files with plenty of unstructured documents relevant to each case. To better do his job, he would like to modernise by leveraging LLMs to search through and investigate his files.
Embedding your data into a vector DB
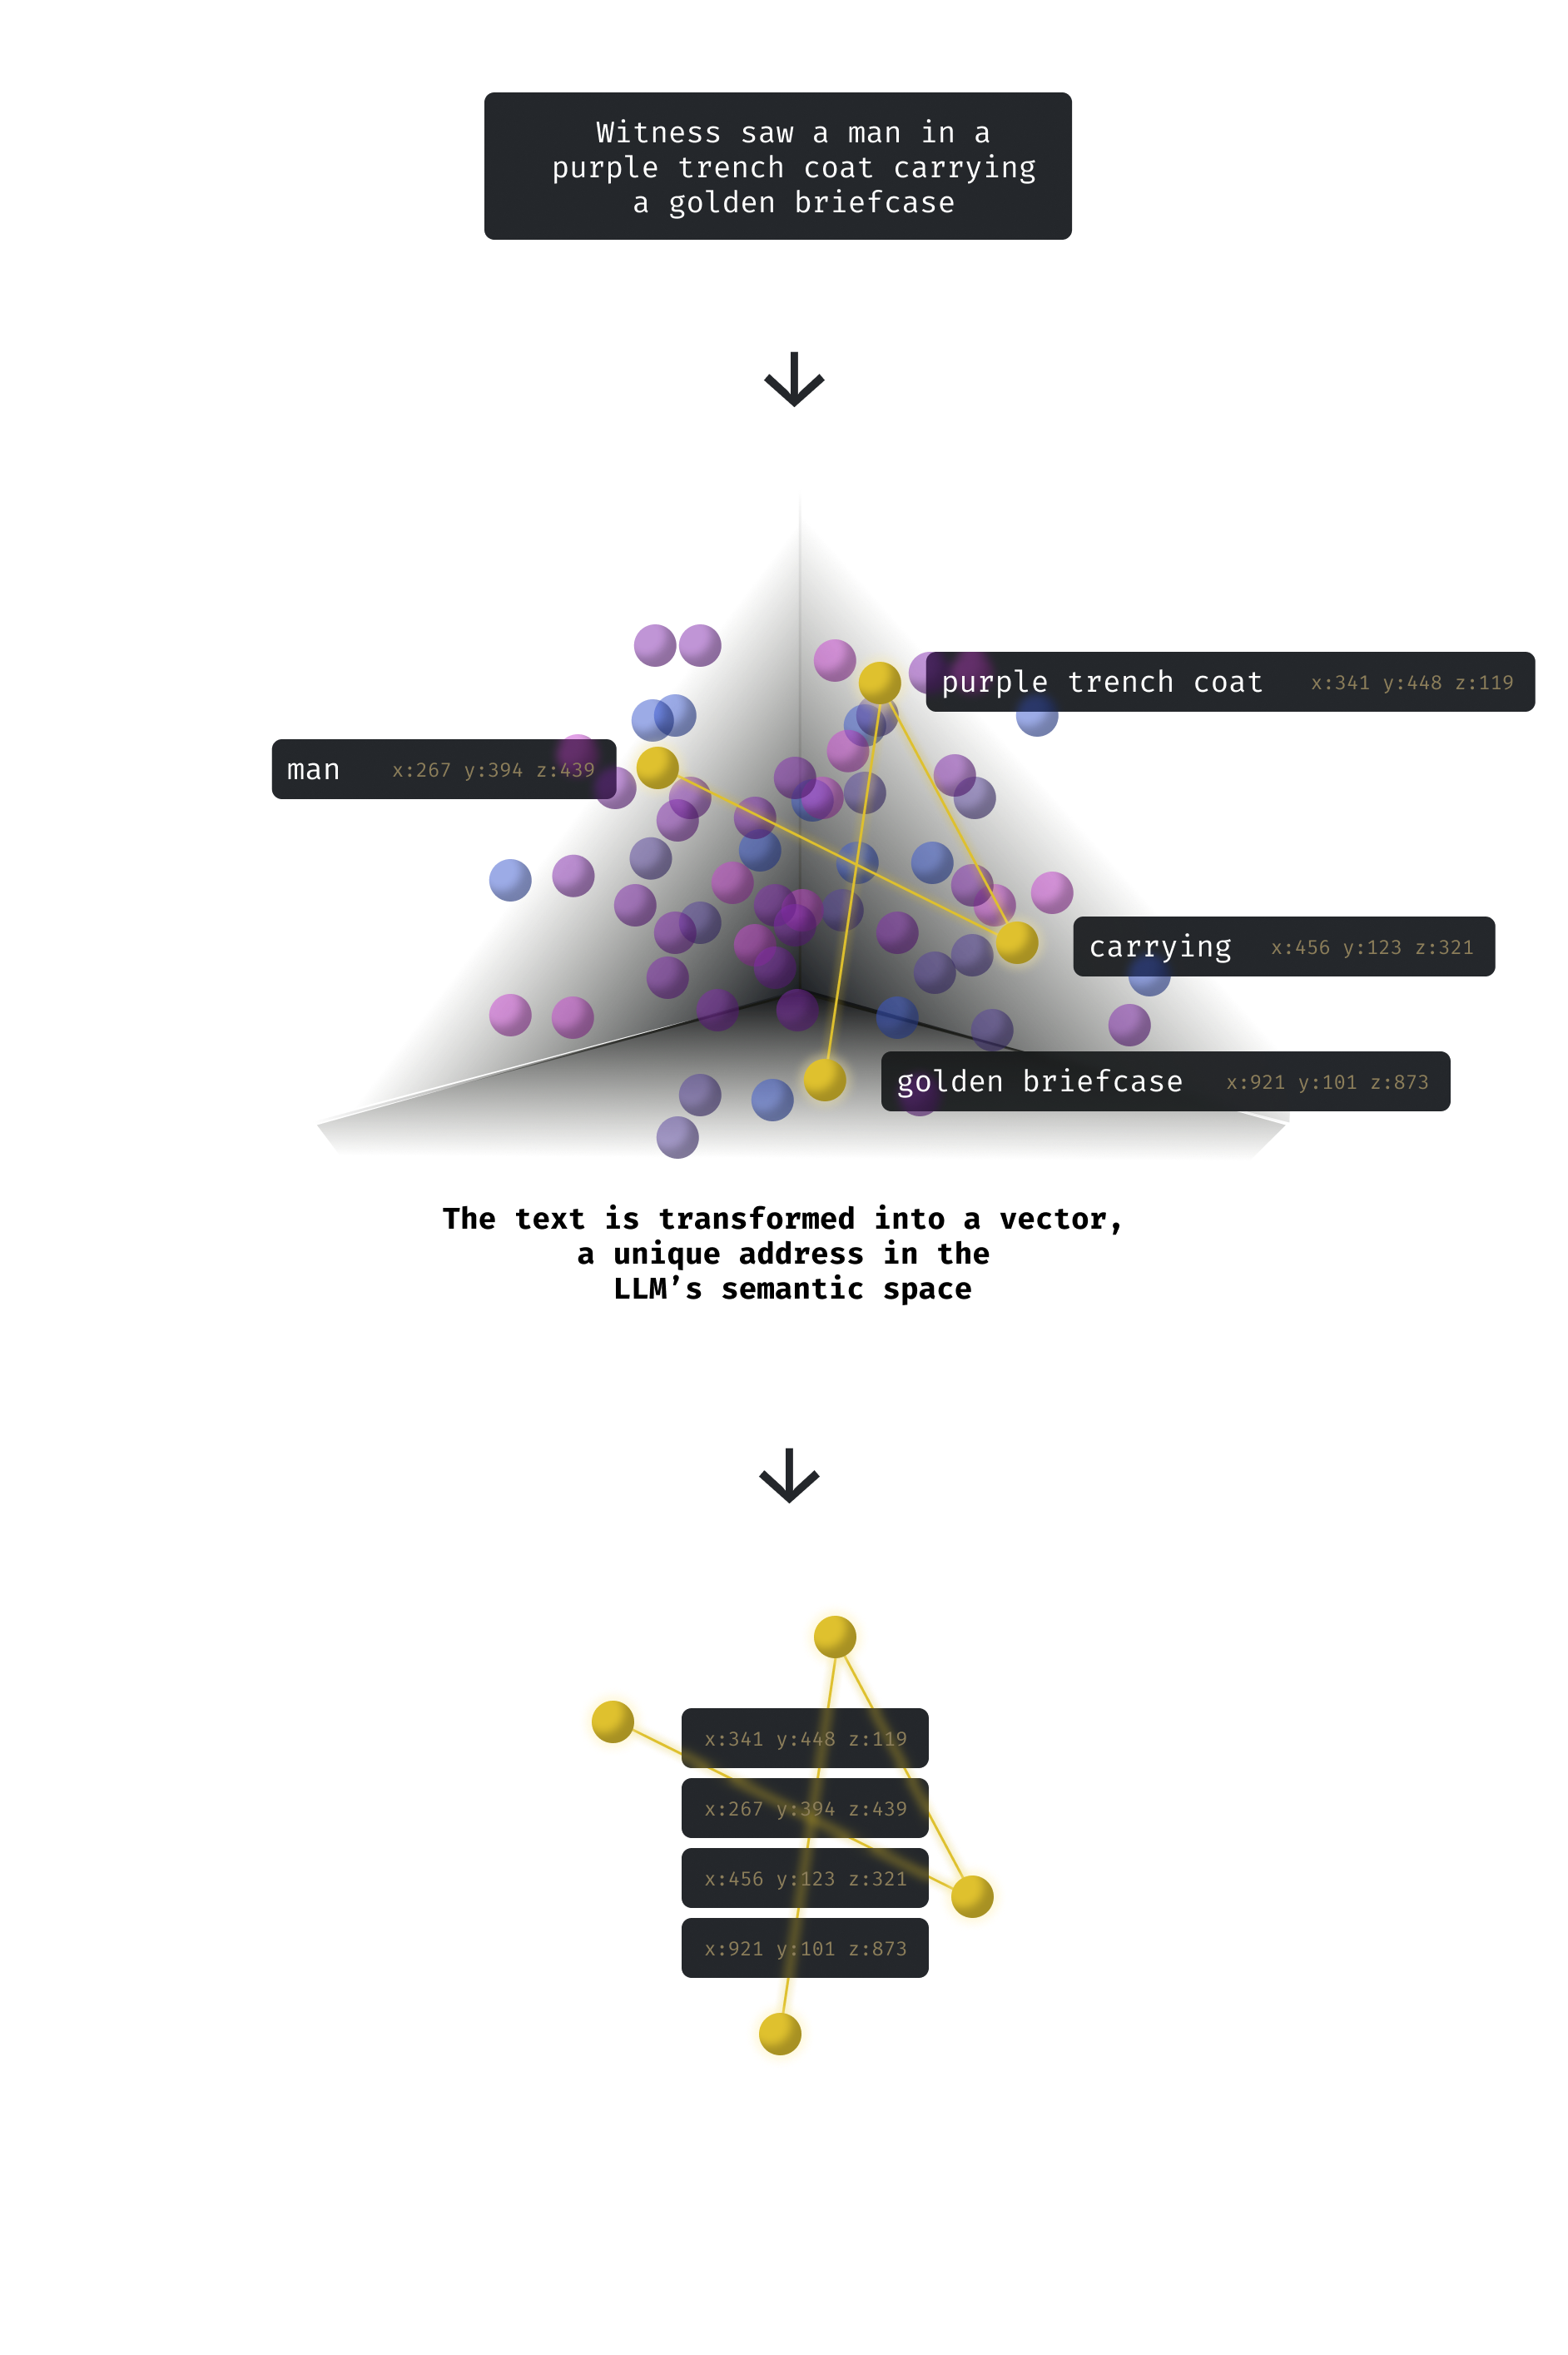
The first thing we will need to do is embed these case files, using a process called chunking. This literally means taking all of the documents and cutting them up into similar sized chunks. Each chunk is then embedded.
This is the process of taking each chunk, which is essentially just a block of text, and running it through an embeddings model to produce a vector representation, a numerical encoding of the text’s meaning in that model’s learned semantic space.
It is worth noting that if you use OpenAI’s embedding models, for example, the resulting vectors represent how that text is positioned conceptually within OpenAI’s language models’ understanding of the world. Embeddings from one model are incompatible with another’s since they exist in entirely different vector spaces and cannot be directly compared or used interchangeably.
A vector can be thought of as the coordinates of that text within the model’s learned semantic space. Each dimension in the vector corresponds to a feature the model has learned about language during training. Together, those numbers act like an address in the model’s “brain,” showing where that piece of text conceptually lives relative to everything else it has ever seen.
Texts with similar meanings have vectors that sit close to each other in this high-dimensional space, while unrelated ideas are far apart. This is what allows similarity search to work: by finding nearby vectors, we are effectively finding nearby ideas.
Let’s consider the following chunk: Witness saw a man in a purple trench coat carrying a golden briefcase.
This visualisation is simplified for illustration purposes. In reality the vectors are a lot more complex and conceptual.
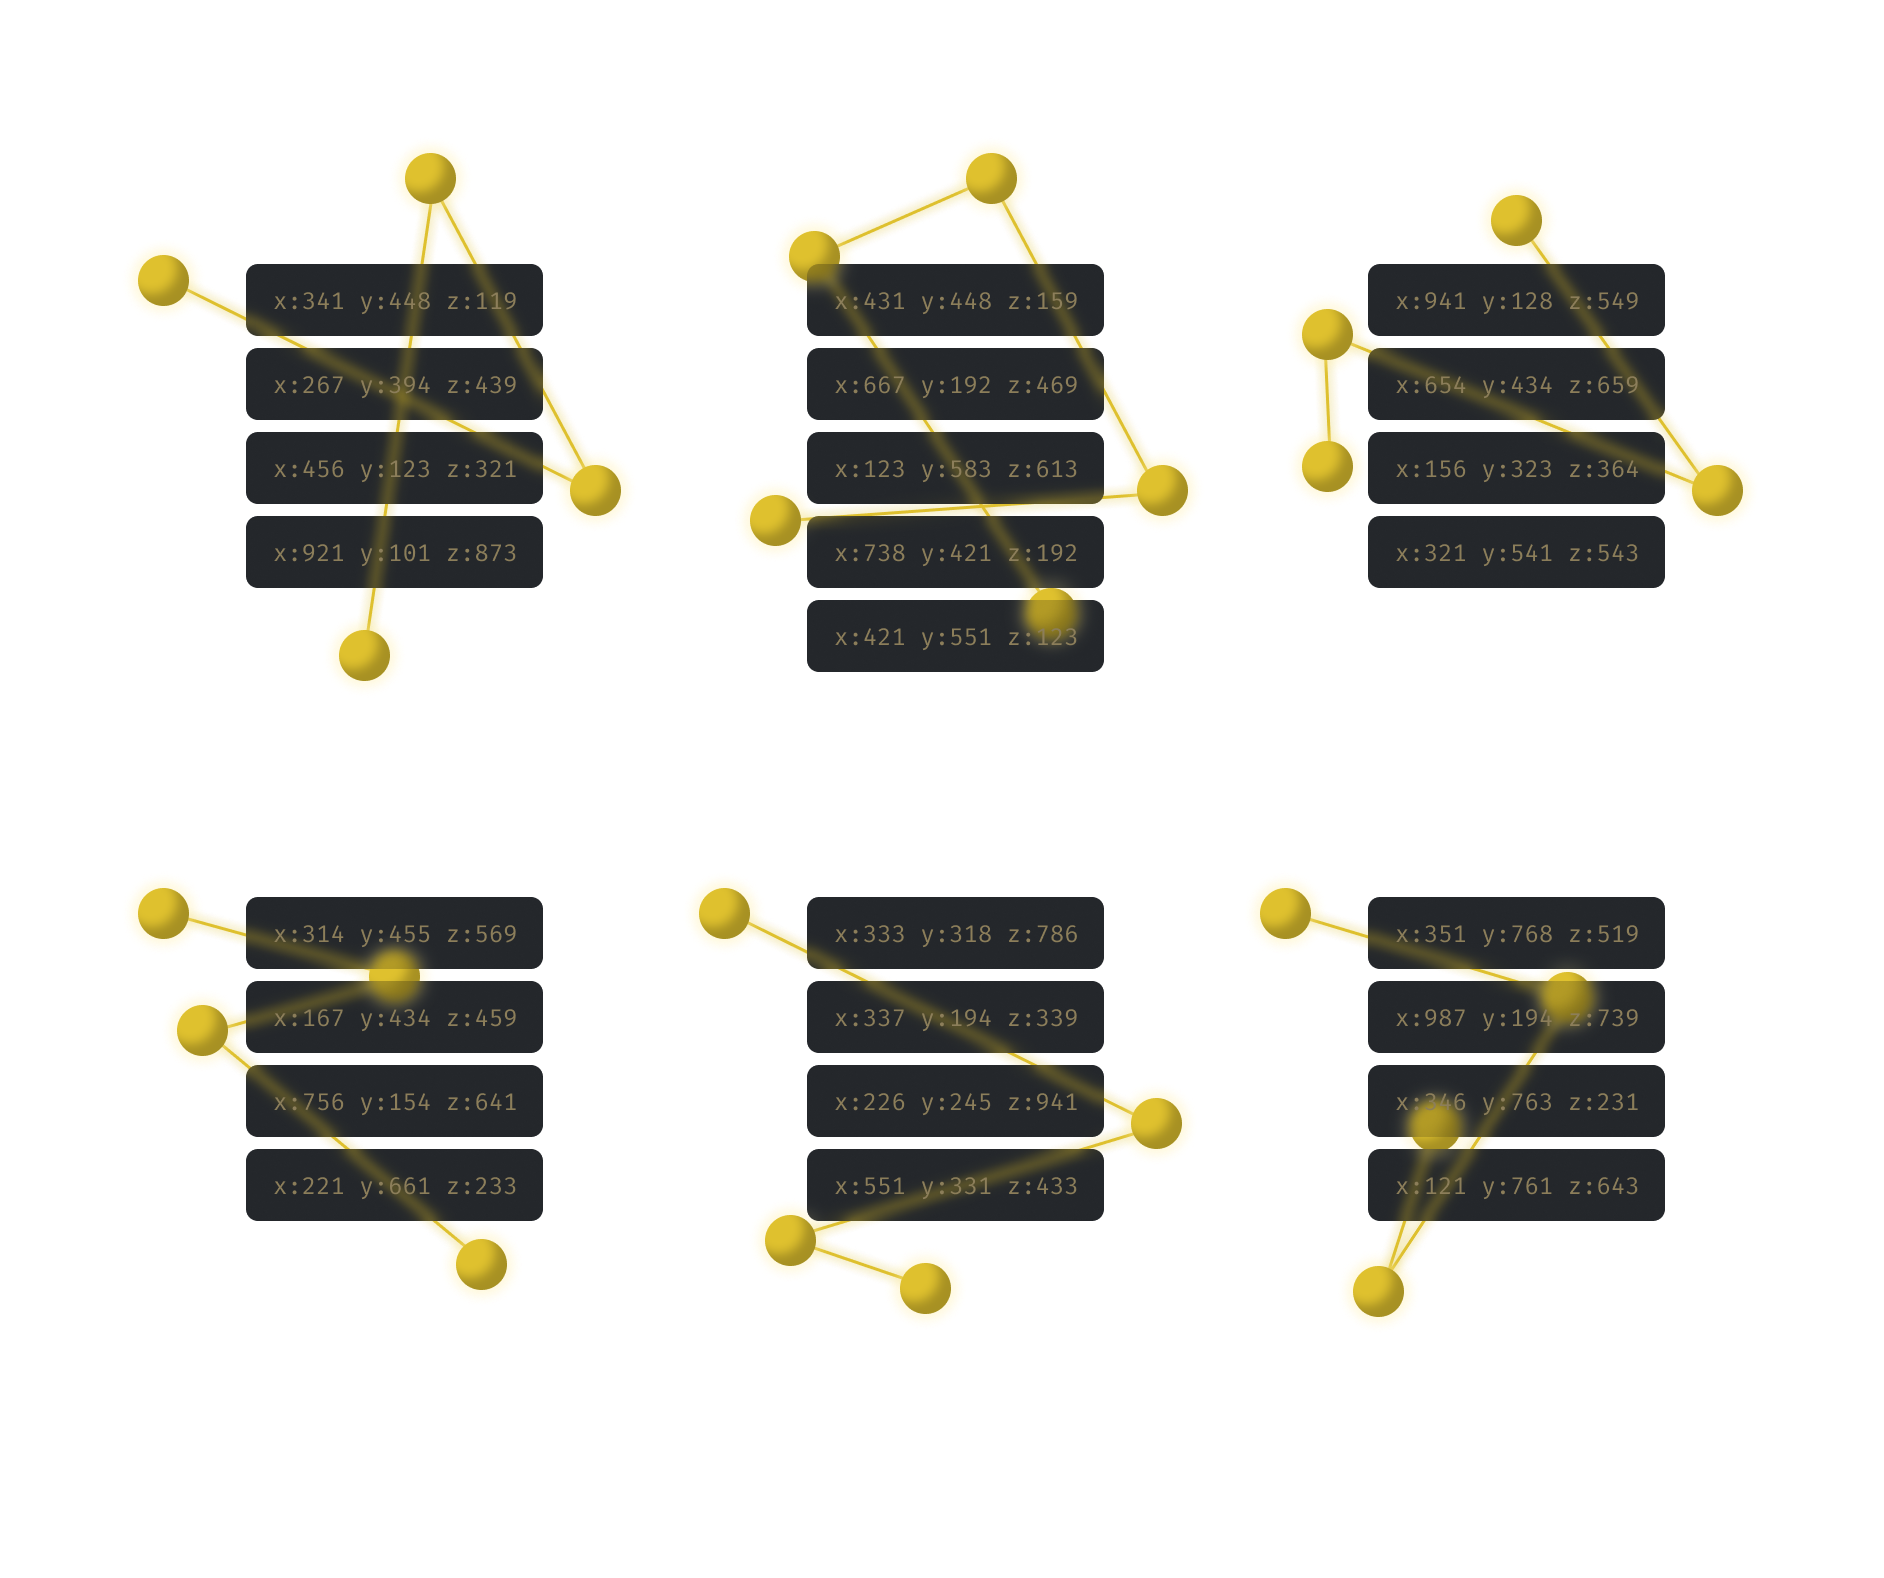
So after embedding all of the case files, we will pretty much be left with a large library of chunks that represents all of the data in the case files.
Searching your data for relevance
Now the fun part. Let’s say we want to find a case, but all we remember is that someone involved had a golden briefcase.
So we will search for Someone with a golden briefcase.
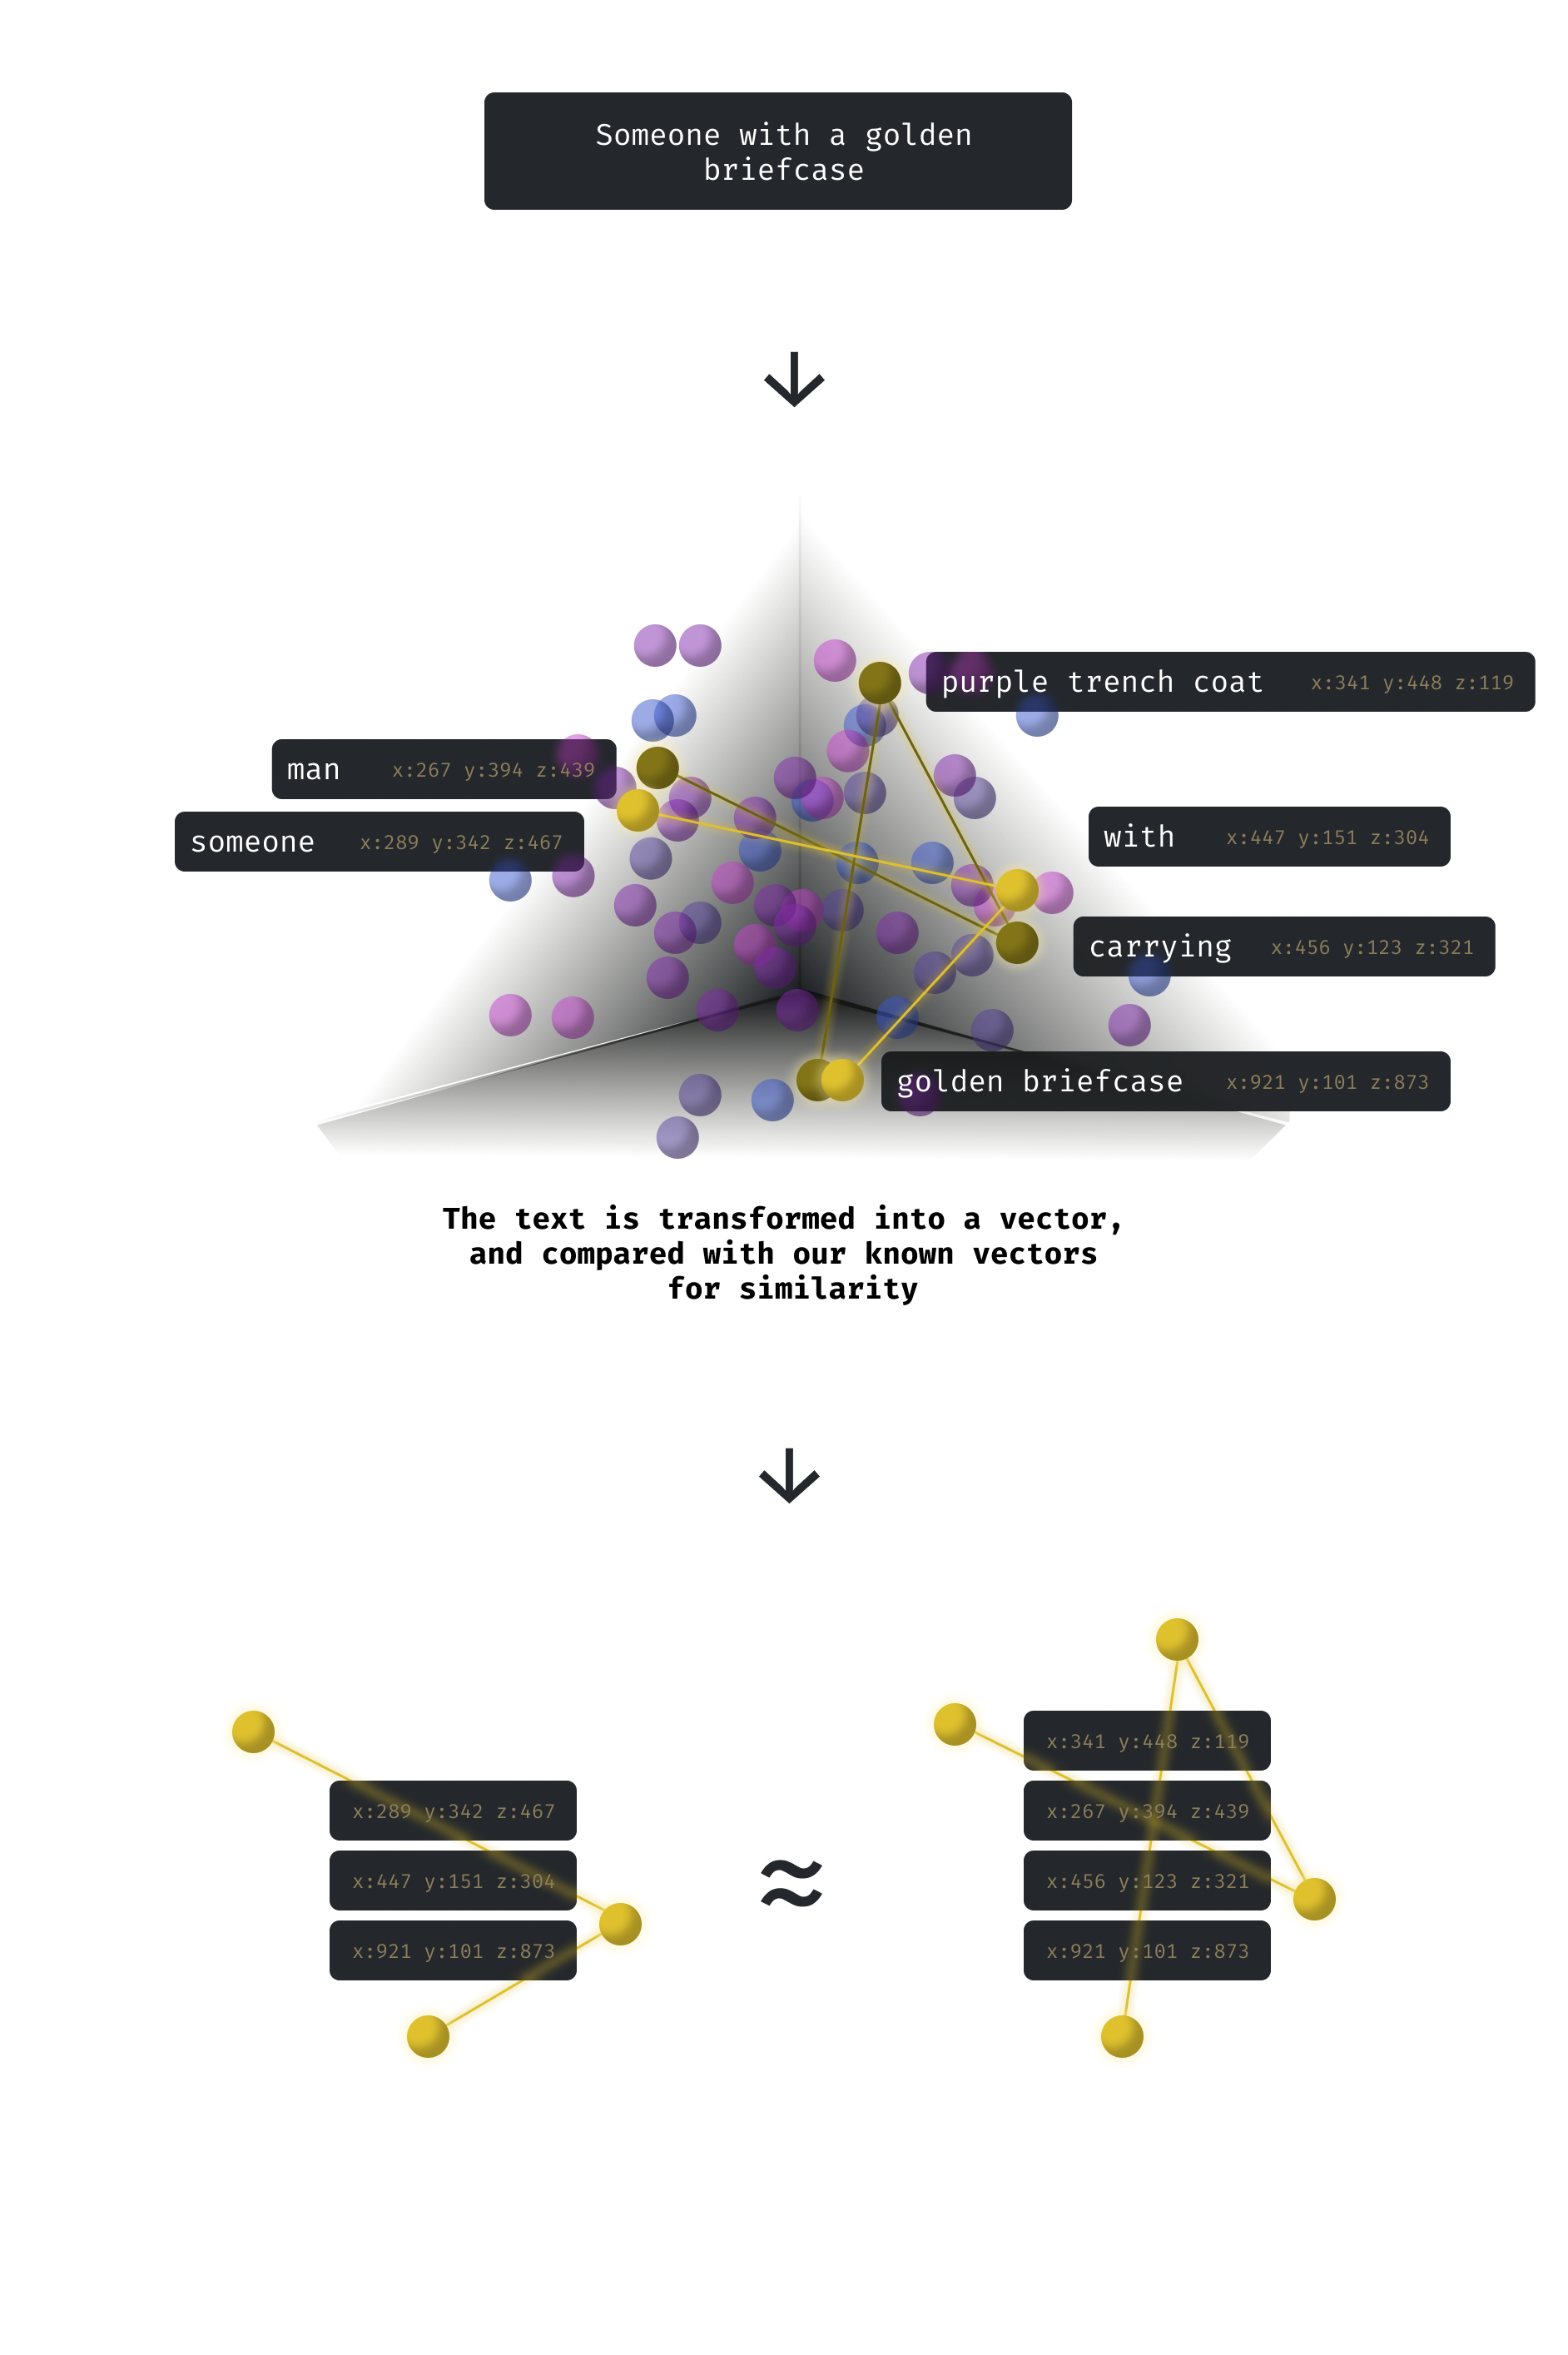
We can see that when the question is embedded, and we compare the vector representation with those that we have in our database, we can find quite a similar match, even though it’s missing a node.
This will basically return us the original statement Witness saw a man in a purple trench coat carrying a golden briefcase, the file it was found in and ultimately the case it belongs to.
And that’s it! The rest is left up to the greater LLM to contextualise the results from this agent and answer the question accurately and contextually.
How is this different to just keyword searching?
It might seem like we could have just implemented a straightforward keyword search that scans the documents for phrases like “golden briefcase”, and you would be right if that was all we needed. A simple keyword index can quickly find exact text matches.
But that approach stops there. It doesn’t understand what you’re actually asking for.
The power of a vector-based search is in its flexibility. Instead of looking for literal word matches, it looks for meaning. If you search for suspect carrying a shiny case, it can still find the document where the witness mentioned a man in a purple trench coat carrying a golden briefcase. Even though none of the words are the same, the model recognises that the ideas are related.
This means you can query your Drive using natural language, the same way you’d talk to a colleague, and still surface the most relevant information. It’s what makes LLM-augmented search so much more powerful than traditional keyword matching; it does not just find words, it finds concepts. At least in theory.
Setting it all up in GCP
With the decision of a RAG-based approach and a general understanding, we can begin setting everything up in GCP using their Vertex AI Search App product.
Preparing your Drive
One of the advantages of this approach is that you don’t need to carefully structure your data ahead of time. Vector search doesn’t care whether your information is neatly tagged, categorised, or indexed. It just needs the raw text. However, as we’ll see later in the results section, some level of structure can significantly improve accuracy and make filtering more effective. The LLM handles the semantic connections, letting you surface insights from completely unstructured chaos.
In Monk’s case, that means he could throw in every case note, transcript, and police report he has ever collected, and still ask questions like “Which witnesses mentioned a man in a trench coat near the pier?” without having to label or sort anything first.
That said, a little order can go a long way. If you want more control and sharper results, introducing a modest structure can help. For example, grouping documents by case, even just at a high level, gives you the option to narrow a search down to a single investigation. Instead of sifting through his entire career, Monk could focus the model on one case file, producing faster and more relevant answers.
In short, structure isn’t required, but it’s a helpful tool when you want to guide the search just enough to keep it on track.
We organised Monk’s Drive folder like this:
  .
  ├── Case_001_Museum_Curator
  │   ├── Initial_Incident_Report
  │   ├── Monk_Investigation_Notes
  │   ├── Witness_Statement_Chen
  │   └── Forensics_Report
  ├── Case_002_Restaurant_Critic
  │   ├── Case_Summary
  │   ├── Witness_Statement_Antonelli
  │   ├── Toxicology_Report
  │   └── Monk_Solution_Notes
  ├── Case_003_Magicians_Assistant
  │   ├── Incident_Report
  │   ├── Forensics_Analysis_Props
  │   ├── Witness_Statement_Blackwood
  │   └── Monk_Case_Resolution
  ├── Case_004_Parking_Garage
  │   ├── Initial_Report
  │   ├── Witness_Interview_Cross
  │   ├── Monk_Final_Solution
  │   └── Surveillance_Analysis
  └── Case_005_Radio_Host
      ├── Case_File_Summary
      ├── Interview_Transcript_Vance
      ├── Arrest_and_Confession
      └── Evidence_Report_Security_Footage
You can also look through the actual documents here.
The Setup
For easy reference, we will highlight any values you will need to set aside to use as ENV variables later on.
1. Create a Google Cloud Project
The first thing you’ll need is a Project in GCP. This will be the container in which you’ll create all the GCP products and services relevant to this solution, bound by specific access rules.
In the search bar type “create a project“
Click on Create a Project in the search results
Assign a meaningful name and billing account
In our example we are using Monk’s Case Files
Ensure that the project is selected for the rest of this guide
Note this ID as VERTEX_PROJECT_ID
2. Enable Required APIs
With our project created, we can now enable the APIs that we will need to build our agent. GCP comes with a whole range of APIs (essentially products and services) that need to be enabled to be used.
Navigate to APIs & Services
Click on + Enable APIs and services
Ensure the following APIs are enabled by searching for them and checking their status:
Cloud Storage
Vertex AI API
Cloud Resource Manager API
3. Set Up IAM Roles
The way GCP works is that each API specifies a set of permission roles that allow you to manage who can use these APIs and how. They are disabled by default, so we need to manually add these roles against our user accounts before we can start using the APIs.
Navigate to IAM & Admin and then IAM
Find your email address in the table of principals
Edit your principal
Click on + Add another role
Add the following roles:
Vertex AI User
4. Create a Search App
Now we can start creating the actual agent
Navigate to Vertex AI and then Vertex AI Search
Under the Create a new Search app section, select the Custom search (general) option and click Create
Here we need to configure the app
There are two options that come pre-selected. We recommend keeping these as they offer useful additions to the tool, like summaries of the matched chunks as well as answers
Enterprise edition features
Generative responses
Give your app a name
We’re calling it Monk’s Case Files Search
Your company name
Set the location of your app.
We kept it global
Note this location as your VERTEX_SEARCH_APP_LOCATION key
5. Connect our GDrive as a Data Source
The next step is to connect our shared Drive folder to the Search App we just created as a data source, so Vertex can generate all of the embeddings
The previous step should have landed us on a Data section of the Search App
Click on + Create data store
Under Workspace sources select Google Drive
Select Specific shared folder(s)
Find the ID of the shared folder, using the instructions listed under the input, and paste it there
Give the data connector a name
We’re calling ours Case Files
You might be asked to select Google Identity as your access control setting. In this case, click Configure access control, and for each location, set Google Identity as the Identity Provider. Then go back to the data connector setup and click Reload to register the changes.
You will also need to enable Smart features in other Google products on your workspace.
Finally, Create.
And click Create again when you’re taken to the Data Stores table.
Note the ID of the created app as your VERTEX_SEARCH_APP_ID
And that’s pretty much it. We’ve now got an API (which we’ll cover in the next section) that connects us to the Vertex Search App we just created, which is itself connected to our shared Google Drive folder.
You might need to give it some time before using the API until the documents in the folder are processed. Unfortunately, the GCP Console doesn’t show a lot of information in this regard, so you just have to play around with it until it starts giving you results.
Using the API
Now we can start interacting with it through the API. This is where everything comes together. We put together a Postman collection you can download and use to interact with this API.
Authentication
Authentication is a critical part of this setup, especially since the Search App connects to a shared Drive. As you know, Google Drive has its own permission model, where access to files and folders is granted to specific user accounts.
For the Search App to work and uphold the permissions assigned at the Drive level, the Search App API needs to be authenticated using a token from a user account within the workspace. You cannot use service account keys to authenticate with the API; it must be via user tokens. This is because Vertex AI Search needs to enforce the same Drive-level permissions that apply to the authenticated user, ensuring search results only include documents that user has access to.
Generate a token using the GCP Console
Navigate to the console in your browser and click on the terminal icon somewhere around the top right of the page. This will activate the Cloud Shell. This will require you to authorise your account again (even though you’re currently logged in with that account). Once authenticated, you’ll have a terminal at the bottom half of the console.
Run this command to generate an access token against your user account.
gcloud auth print-access-tokenYou can now use this token in postman to authenticate the requests and test your Search App. Navigate to the collection in postman, clicking on the collection root folder. Go to the Auth tab, paste the token in the input. Ensure that the Auth Type selected is Bearer Token.
As long as each endpoint in the collection has it’s own Auth set to Inherit auth from parent, they will use this token to authenticate with the API.
Generate a token programmatically
Obviously in practice, this will need to be done programmatically. This will highly depend on what language you’re coding in. It’s beyond the scope of this article to go into that detail, but we’re sure your favourite LLM can help you better than we can with this.
Endpoints
You can access the API using the following endpoint
https://discoveryengine.googleapis.com/v1alpha/projects/{{VERTEX_PROJECT_ID}}/locations/{{VERTEX_SEARCH_APP_LOCATION}}/collections/default_collection/engines/{{VERTEX_SEARCH_APP_ID}}/servingConfigs/default_config:searchSave yourself hours of debugging by making sure you’re using the v1alpha API version, and not the v1 like Claude originally recommended to us. Granted, we should have just looked at the integration instructions, but it was an oversight that cost us hours and headaches.
where the URL parameters are
VERTEX_PROJECT_ID is the ID of the overall project we created
VERTEX_SEARCH_APP_LOCATION is the location we specified when creating the App
VERTEX_SEARCH_APP_ID is the ID of the Search App we created
and the request body for searching the chunks is:
{
  “query”: “YOUR SEARCH QUERY HERE”,
  “pageSize”: 5,
  “contentSearchSpec”: {
    “searchResultMode”: 2,
    “snippetSpec”: {
      “returnSnippet”: true
    },
    “chunkSpec”: {
      “numPreviousChunks”: 3,
      “numNextChunks”: 3
    },
    “extractiveContentSpec”: {
      “maxExtractiveAnswerCount”: 3,
      “maxExtractiveSegmentCount”: 3
    },
    “summarySpec”: {
      “summaryResultCount”: 3,
      “includeCitations”: true,
      “ignoreAdversarialQuery”: true,
      “ignoreNonSummarySeekingQuery”: true
    }
  }
}
and the request body for searching snippets is:
{
  “query”: “YOUR SEARCH QUERY HERE”,
  “pageSize”: 5,
  “contentSearchSpec”: {
    “searchResultMode”: 1,
    “snippetSpec”: {
      “returnSnippet”: true
    },
    “extractiveContentSpec”: {
      “maxExtractiveAnswerCount”: 3,
      “maxExtractiveSegmentCount”: 3
    },
    “summarySpec”: {
      “summaryResultCount”: 3,
      “includeCitations”: true,
      “ignoreAdversarialQuery”: true,
      “ignoreNonSummarySeekingQuery”: true
    }
  }
}
You have the option to search at the snippet level or the chunk level. Snippet search returns short excerpts from documents that are most relevant to your query, which is great for quickly scanning results. Chunk search, on the other hand, retrieves larger, contiguous blocks of text, including surrounding context from previous and next chunks. This provides the LLM with more context to reason over, which can improve answer quality and help the model generate more accurate or nuanced responses. Choosing between the two depends on whether you want quick hits or deeper contextual understanding.
Integrating into other LLMs
You can now integrate this API into any LLM that supports function calling, tools, or retrieval augmentation. This is what allows your vector database to power other models, not just one.
You can connect it to OpenAI’s models, Gemini, Claude, or even a local model, giving them access to your private corpus for more informed answers, creating a rich eco-system of agents.
The Results
Let’s see how well the agent works in practice now, using Monk’s case files. The analysis that follows is based on results obtained through the Postman collection referenced earlier.
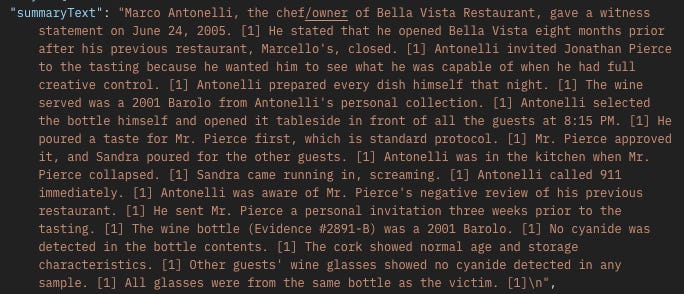
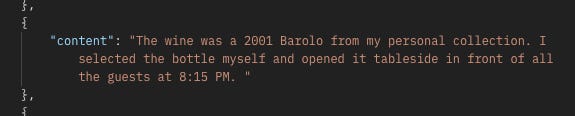
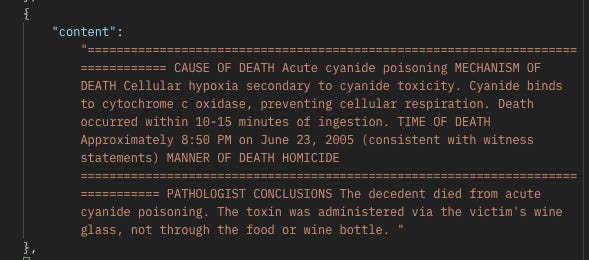
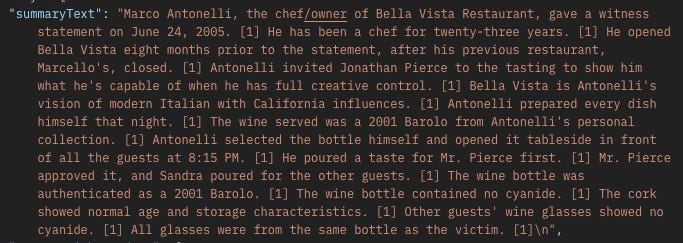
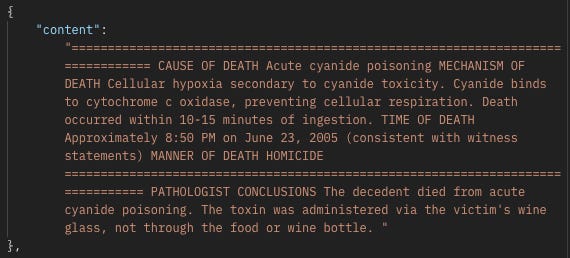
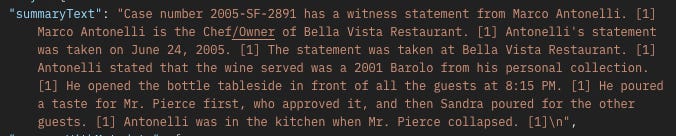
In Marco Antonelli’s witness statement in the Restaurant Critic case, he mentions that he served a 2001 Barolo wine from his personal collection.
“The wine was a 2001 Barolo from my personal collection. I selected the bottle myself and opened it tableside in front of all the guests at 8:15 PM. I poured a taste for Mr. Pierce first - that’s standard protocol. He approved it, and Sandra poured for the other guests.”
Let’s see if we can get a hit for that. Let’s search for any witness statements that involve a 2001 Barolo wine
We can see that the summary correctly describes Marco Antonelli’s witness statement. Inside the response’s references section, we can see all the chunks that were returned by the search, showing the exact extract in the witness statement that includes the Barolo wine
As well as others that are contextually a bit further away, matching on wine alone
Let’s see what happens when we remove wine from the search, any witness statements that involve a 2001 Barolo
The summary looks pretty much the same
with the chunk references also pretty similar, including chunks that only include the word wine.

This likely means that the RAG system is smart enough to understand that Barolo is a wine, and so anything related to wine must be close in it’s semantic space. Vertex could also be returning neighbouring chunks when it finds a relevant one, however that cause of death report is in another document altogether.
We tried setting numPreviousChunks and numNextChunks to 0 and we still got the cause of death, so it points to contextual results.
Ideally, it would be useful to find out which case this was referring to exactly. While it might be in the returned chunks, we don’t want to stay parsing that data to look for the case, so let’s try and ask it.
Which case has a witness statement that involves a 2001 Barolo?
Case number 2005-SF-2891, perfect. That’s the exact case number we were looking for. It doesn’t mention the Restaurant Critic, but it makes sense that it wouldn’t know the folder names. A limitation to keep in mind.
So far so good, but let’s search a bit broader since Barolo is quite specific.
Which cases involved Leland?

The answer correctly lists two cases where Leland Stottlemeyer was the lead investigator. However, we also know that he was the lead for ALL the cases, not just these two.
One reason for this could be the summaryResultCount, which is set to 3. If we increase it, maybe more results will be considered.

Increasing to 10 gave us another case. Unfortunately, this is the max that summaryResultCount goes. Updating the pageSize doesn’t help either. So it looks like we’re stuck at 3 cases even though we know it’s 5.
Let’s try and get even more general. We know that the Magician’s Assistant case includes a motive of jealousy. So let’s try and get this case returned to us, but by using the context of jealousy rather than the word itself. Envy means jealousy, and is not used anywhere in the documents for this case, so let’s try that.
Which cases involve envy?

No results. We know this is wrong, so maybe the contextual search isn’t that great. Let’s try jealousy directly.
Which cases involve jealousy?

That’s disappointing.
In Monk’s notes, he writes
Everyone thinks this is about jealousy. A magician who lost his girlfriend, or a fiancé who wanted revenge. But it’s not. This is about a trick within a trick. Magic.
Maybe it’s that smart? Let’s try
Which cases seem to be about jealousy, but really aren’t?

Vertex isn’t even going to try. Very disappointing.
Do any cases involve magic tricks?

That’s unfortunate. Let’s try another one. We have one case that happens inside of a parking garage.
Do any cases happen inside of a parking garage?
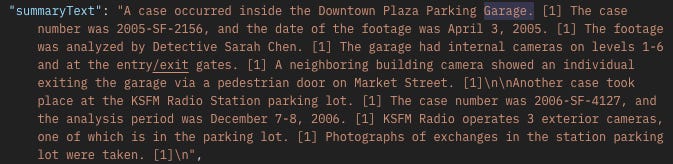
It looks like we got two hits this time. This is better, but confusing as to why the magic tricks wouldn’t work.
Do any cases involve a magician’s assistant?

So we know that this case's documents are processed by Vertex, it’s just that for some reason it doesn’t pick up magic tricks.
By now you should have gotten a bit of an idea of how this behaves and what quirks it has. Ultimately, you’ll need to create your own Search App connected to your own data and spend some time playing around with the search queries to understand how Vertex behaves with your data.
We’re still exploring other API configuration options that could boost relevance. As we discover what works best, we’ll cover it in upcoming articles.
Filtering for improved accuracy
One neat trick for improving search accuracy is the ability to filter results by folder.
This isn’t officially documented anywhere, so it’s liable to break. While snooping through the network tab of the Search App Preview in the GCP Console, we noticed a certain filter being applied at the root of the request. So we tried it out and luckily it worked.
If you already know which folder you want to search in, you can extract its ID from Google Drive and append it to your query like this:
"query": `Your search query in full? (((parent:<folder_id>)))`So if your folder ID is JDFH9382E92EH58 your query would become
“query”: "Your search query in full? (((parent:JDFH9382E92EH58)))"This tells the Search App to only consider documents within that specific folder, effectively narrowing the dataset the LLM reasons over. In practice, this is incredibly useful when you have a large shared Drive with many unrelated files because it allows you to focus on a specific subset of documents without restructuring your entire database.
It’s a simple addition that can significantly improve the relevance of the results, especially in data-heavy or unstructured environments like our Monk case files.
Let’s try searching for envy again, except this time filter down to the case itself.
Does this case involve envy or jealousy? (((parent:FOLDER_ID)))

So narrowing down the dataset doesn’t work for a purely contextual question either. What about magic tricks?
Does this case involve magic tricks? (((parent:FOLDER_ID)))

Finally, we got something. Nothing big or descriptive, but at least it’s something.
What we think about it overall
It’s very easy to set up
It’s pretty straightforward to configure Vertex and connect your Google Drive to it. It doesn’t take much time at all to do it using a quick how-to prompt in ChatGPT or Claude.
Although they didn’t seem to get the full flow perfectly, the GCP setup was easy enough to navigate and figure out the missing pieces.
The documentation on how to use the API could be better, but this feature is probably still in its infancy and needs more TLC from the Google team.
It’s not that flexible
By flexible, we mean the ability to tag documents with metadata and use API filtering options to narrow down the search and increase the probability of an accurate result. Their API documentation does include some sections on filtering, however, nothing related to filtering Google Drive as a data source.
In the end, we did end up finding a way to filter, however, it doesn’t seem to be officially supported so we’re not sure how long this solution will hold up for.
Similarity matching can be very keyword based
Sometimes the results seemed to require the actual keywords to get a match. It takes a bit of experimentation to find the right balance between including the keywords you want the system to hit and providing enough context for the LLM to understand the intent behind the query. Too few keywords, and the model might miss the specific detail you’re looking for. Too many, and you risk over-constraining the search, causing it to ignore relevant results that are phrased differently.
Similar documents or templates tend to mask results
We noticed that in scenarios where a folder might have a template and then an instance of that template with real-world data, the results sometimes pick up the template and satisfy the question, overlooking the real-world data altogether. Increasing the number of allowed results in the request body helped the case a bit, but not always. Sanitising the Drive for this also helped, by keeping templates totally outside of the connected folders. These solutions aren’t exactly ideal, but necessary at this stage of Vertex’s maturity. It would be great if they added a layer of Gemini somewhere in the retrieval workflow to better reason about the documents in the result.
OUT_OF_DOMAIN_QUERY_IGNORED happens quite a lot
This response is received when Vertex determines that the question isn’t relevant to any data it has in its embeddings table and subsequently decides to ignore the query altogether. It’s basically a ‘will not answer’ from Vertex. Again, this takes some experimentation to learn how to phrase questions in a way that gets you results. This makes it a lot harder to use, especially if you’re piping the question directly through to Vertex from the user. An option to help with this, if you’re using another agent to access this tool, would be to create an agent tool that can take the user’s query and generate a better version of the query more likely to get results from Vertex.
The data source tools are very basic
The tools in the Console to see what’s happening behind the scenes with the data source, which in a way is the core of this feature, are very basic. It’s pretty much just limited to the status of whether or not it’s active and a few last updated and last synced dates. It would be great to be able to actually see a list of the documents that have been processed, how they handle changes to the original documents, the ability to schedule process intervals, and other related functionality.
You have to give Google access to your entire Workspace
Unsurprisingly, to let Vertex access Google Drive and use its AI capabilities, you need to enable Smart Features across all Google products. In practice, this means granting Google broad access to your data so it can be processed by the AI. We’re not too keen on this approach, as it feels like an all-or-nothing permission since there’s no way to limit access to only the specific data we actually want to share.
Overall, this was a pretty straightforward setup minus a few head-banging moments trying to understand why the agent behaves in certain ways. It definitely delivered the quick and dirty search requirement for the client, and we think Monk will be quite pleased with his implementation too.
This article arrives at a critical juncturre. Your RAG insights are excellent. I do wonder, however, if a more federated vector DB architecture might offer superior data sovereignty than full Workspace integration.